


Do you want to play as a hero that cannot be beaten by ANY hero 1v1?
Do you want to be able to kill one of the three heroes that ambuses you, then run away unharmed?
Do you want to be able to teleport at will?
Get every kill in a creep wave in only three seconds?
Permanently disable a single enemy hero?
Listen to your opponents call your hero "as broken as 5.84b Medusa" while you demolish their base?
There is one and only one hero for you.
Manta style on Boush the Tinker
How to build the perfect hero
By Virot2.
Last updated for 6.36b.
I. Table of Contents
Introduction
Summary
Stats and Skills
- Stats
- Skills
Skill and Item Build
- Skill list
- Short item list
- Long item list
Strategy Guide
- Earlygame- until Boots of Travel
- Midgame- until Manta Style
- Lategame- after Manta Style
Important Tactics
- Aiming March of the Machines
- Manta/March Turbo-Pushing (VERY IMPORTANT)
- Cyclone/Purge Use
- Lategame Combat vs. a Single Hero
- Lategame Combat vs. a Gang of Multiple Heroes
- Combat in Team Battles
- Permahex
- Clock Tricks
Troubleshooting
- Unpleasant Heroes Earlygame
- Trouble Farming for Boots of Travel
- Aggressive Pusher Opponents
- Permabash
FAQ
Final Note
Replay Section
1. Introduction
When most people think of Tinker, they think of an annoying and boring nuker that is strong early game but quickly gets weak once heroes advance beyond level 8. I am here to tell you that this conception is completely and utterly false. Tinker is weak when played as a nuker. He gets damage roughly equivalent to Lion or Lina, but unlike the other nukers does not get more powerful nukes at later levels and does not have a stun. I will describe a Tinker strategy that will make Tinker the an insanely strong combat hero and one of the best pushers in the game. Use this strategy, and you will have a tool for every occasion, an answer to every threat. You will be strong early, middle and lategame. If you like being prepared for anything, you cannot choose a better hero than Tinker.
Before I begin, I will state clearly that this strategy has only been tested in public games. I have never played a TDA game (I play on Lordaeron) or a clan match. Chances are, this guide will not help you win any CAL matches, though if you're playing in those, you probably don't need a guide anyways. What this guide will do is give you an extremely entertaining strategy that will allow you to dominate just about any public game (I cannot speak for TDA or IH games). This strategy has been thoroughly tested, and I maintain a win ratio of around 95% when I use it in public games, which is vastly higher than that of any other strategy I have tried.
Enjoy your stay, and good luck!
2. Summary
For earlygame, we will max the skills Missile and March, with one level of Rearm. After building a Eul's to defend ourselves, we will build to Boots of Travel and Manta Style. With these items, we suddenly become an insanely fast pusher, the fastest in the game besides KotL (this is NOT exaggeration, as you will see). We will use the BoT to jump at all times to push the lane with the weakest defense or strongest attack. As money rolls in, we will build uber-items: Guinsoo's, Linken's, Radiance, and Skadi. Lategame, we will be so strong that we can beat in combat any single hero, most pairs of heroes, and even some groups of three heroes. The enemy defense cannot last forever against an incredibly powerful foe who can teleport at will to defend or attack.
3. Stats and Skills
Stats
Name: Boush the Tinker
Description: Boush has been educated in the most advanced goblin technology. These mechanical systems allow him to damage his enemies from a distance, while keeping himself relatively safe. He can also upgrade his systems to allow his weapons to fire quickly. A true demonstration of the power of knowledge.
Strength: 17 + 2.0/lvl
Agility: 13 + 1.2/lvl
Intelligence: 27 + 2.2/lvl
Damage: 22-28 + INT (Initial Damage: 49-55)
Armor: 2 + AGI*0.14 (Initial Armor: 4)
Initial HP: 473
Initial MP: 351
Speed: 305 ("Fast"; becomes "Very Fast" with Boots of Speed")
Range: 500
Comment: Tinker has below average stat growth. He gains a total of 5.4 stat points per level, by contrast to an average of 6.2 among most other heroes. In particular, Tinker's intelligence growth of 2.2/level is the lowest of all intelligence heroes except Ogre (the lowest, at 1.9/level). Tinker does, however, have very high starting intelligence, which combined with his very reasonable range and his generous movespeed allow him to last hit and carry himself well in the earlygame.
Skills:
Information about skills that is not part of the official description will be in blue. If you have already read the tool-tip, please read the blue parts for additional information.
Laser
Fires an intense beam of light at a target, dealing damage and blinding all in the area for 18(9) seconds. Deals precise damage. 14 second cooldown at all levels.
Level 1 - 80 damage, 10% miss. 95 mana.
Level 2 - 160 damage, 15% miss. 110 mana.
Level 3 - 240 damage, 20% miss. 125 mana.
Level 4 - 320 damage, 25% miss. 140 mana.
Comment: As of 6.35, Laser finally deals exactly the stated damage (in older versions it did 75% damage to heroes and other odd things to other units). This makes Laser the strongest single-target non-ultimate nuke in the game! This makes Laser very, very powerful, and we will be using it to establish lane control in the earlygame and set up constant ganks in the midgame. Compared to Heat Seeking Missile, it does much more damage to a single target for a lower mana cost and cooldown. Laser never becomes useless due to its AoE miss effect, which will protect you and your allies in large battles at any point in the game.
Heat Seeking Missile
The Tinker fires a rocket at the nearest visible enemy hero. Range of 2500. 25 second cooldown at all levels.
Level 1 - 100 damage. 120 mana.
Level 2 - 175 damage. 140 mana.
Level 3 - 250 damage, 2 targets. 160 mana.
Level 4 - 325 damage, 2 targets. 180 mana.
March of the Machines
Calls in hordes of robotic goblins to destroy your enemies. 35 second cooldown at all levels.
Level 1 - 16 damage/goblin. 145 mana.
Level 2 - 24 damage/goblin. 160 mana.
Level 3 - 32 damage/goblin. 175 mana.
Level 4 - 40 damage/goblin. 190 mana.
Comment: This is a tricky ability which is primarily used for farming, though it can make a big difference in hero combat too. To learn how to use it most effectively, see the sub-section "Aiming March of the Machines" below. One annoying fact: Creep waves spawn every 30 seconds. March has a cooldown of 35 seconds. That means that March cools down just too slowly to use every wave without also Rearming.
Rearm
Instantly refills the Tinker's weapons. No cooldown.
Level 1 - 3 seconds to rearm. 150 mana.
Level 2 - 2 seconds to rearm. 250 mana.
Level 3 - 1 seconds to rearm. 350 mana.
Comment: The one thing that makes Tinker stand out from the crowd. Rearm will channel for the stated period of time, then refresh the cooldowns of Boush's three other abilities as well as those of any items in his inventory EXCEPT Hand of Midas, Necronomicon, Helm of the Dominator, and Refresher Orb. A quick warning: since Rearm has no cooldown, if you click the ability more than once you will begin to cast it more than once, wasting mana and delaying the rearm, so only click it once!
4. Skill and Item Build
Skills:
Lvl 1-8: Laser x4, Missile x4
Lvl 9: Rearm
Lvl 10-13: March x4
Lvl 14-16: Attribute Bonus x3
Lvl 17-18: Rearm
Lvl 19-25: Attribute Bonus x7
Explanation: Laser is too good to pass up. It's damage is unreduced by anything, making it the most powerful single target nuke available, and it has fairly low cooldown and a reasonable mana cost. This means we will be using it liberally in the earlygame to take control of our lane and make sure we don't have to worry too much about our enemies. Laser alone makes Tinker one of the strongest earlygame heroes.
We also take Missile earlygame to augment our nuking abilities. Although generally we will be casting Laser instead of Missile, the threat of a Missile at any time means that enemies have effectively 244 fewer hit points (the damage dealt by level 4 Missile after reduction). Furthermore, a double nuke makes us much more effective as a ganker.
Although it won't be needed until midgame, March is crucial to the strategy. We must have March in order to push, farm, and fight in large battles, and once we get Boots of Travel we will be able to replenish mana fast enough to use March often.
A note on level 2 and 3 Rearm. Leveling Rearm drastically increases the mana cost, and you may not have enough mana to use the higher levels effectively when you are first able to take them. For this reason, I generally take levels 2 and 3 of Rearm at levels 17 and 18, though you can of course adjust this as you wish to fit the current game or your playstyle.
Items:
I give two item lists, the first of which tells you all you really need to know. The second list is a long laundry list of all the little parts and side items you need along the way. I suggest reading the short list, as it is all you really need, though the second is provided for those who love detail (and for some reason it is expected from guides). Feel free to mess around with the less important parts (i.e., Sapphire Water, Chicken, Null, etc.) to suit your own playstyle.
a. The short list:
1. Null Talisman OR Bracer (510)
2. Boots of Travel (2700)
***3. Manta Style (5500)***
4. Guinsoo's Scythe of Vyse (5175 more)
5. Linken's Sphere (5535)
6. Radiance (5325)
7. Eye of Skadi (6795, with selling Null Talisman/Bracer)
The key items:
b. The long list:
1. Animal Courier (225)
2. Ancient Tango of Essification (and more as needed)
3. Circlet of Nobility (185)
4. Gauntlets of Ogre Strength OR Mantle of Intelligence (150)
5. Robe of the Magi (450)
6. Boots of Speed (500)
7. Observer Wards (and more as needed)
8. Boots of Travel Recipe (2200) -> Boots of Travel
9. Blade of Alacrity (1000)
10. Diffusal Blade Recipe (1550) -> Diffusal Blade
11. Vitality Booster (1100)
***12. Manta Style Recipe -> Manta Style***
13. Robe of the Magi (450)
14. Robe of the Magi (450)
15. Null Talisman/Bracer Recipe (175) -> Null Talisman/Bracer
16. Staff of Wizardry (1000)
17. Void Stone (900)
18. Eul's Scepter of Divinity Recipe (450) -> Eul's Scepter of Divinity
19. Sobi Mask (325)
20. Quarterstaff (1150) -> Oblivion Staff
21. Guinsoo's Scythe of Vyse Recipe (450) -> Guinsoo's Scythe of Vyse
22. Ultimate Orb (2300)
23. Void Stone (900)
24. Ring of Health (875) -> Perseverence
25. Linken's Sphere Recipe (1460) -> Linken's Sphere
26. Sacred Relic (3800)
27. Radiance Recipe (1525) -> Radiance
28. Ultimate Orb (2300)
29. Ultimate Orb (2300)
30. Point Booster (1200)
31. Eye of Skadi Recipe (1250) -> Eye of Skadi
Explanation: The later items, Guinsoo's, Linken's, Radiance, and Skadi, are just luxuries. All we really need is Boots of Travel and Manta Style. This build tries to get Boots of Travel relatively early because when combined with Rearm, it grants Tinker incredible mobility, significant farming potential, and the ability to return to the fountain to regain mana quickly whenever needed. The next item is Manta, the build's key item. After Manta, our power level jumps, and we have enough money for the uber-items. I think no one will argue with Guinsoo's, and Linken's is great for the spell shield, which is refreshed with Rearm. Besides, stat gains and regen both greatly benefit our strategy. Afterwards, I prefer Radiance to improve pushing even more and Skadi for the biggest stat boosts possible, but you can substitute here whatever you like. A note on Skadi- we will not get the benefits of frost attack because feedback from Manta overrides. Nonetheless, with practically unlimited funds we cannot find another item that provides greater benefit.
5. Strategy Guide
I will separate the gameplay chapters into Strategy and Tactics. This section covers strategy, the general, long-term goals and descriptions of what you should be trying to do at each step. Tactics are the individual techniques you will use when confronted with various situations.
Earlygame- until Boots of Travel:
The average player believes that Tinker is strong earlygame but becomes weak later on. Though nothing could be more false than the second part of the statement, the average player is right in thinking that Tinker is strong earlygame. Our main spell at this point is Laser, which is very strong. Once you hit level 3, Laser is strong enough to do serious damage, but you should still use it somewhat sparingly unless laned against a low hp hero. At level 5, it will generally be worth using Laser every time the cooldown ends. Our goal is to outfarm and outlevel our opponents, which we achieve by harassing and hopefully forcing retreats with Laser. Good chicken use helps in this regard by allowing us to never leave the lane. Note that once Missile hits two targets, it does do more damage per mana point if against two heroes; if laned against two low hp heroes, you may consider spamming level 3 and 4 Missile instead of Laser, although in most circumstances the higher focused damage of Laser will be more helpful. At this stage, we do not expect kills without allied help- our goal is to build up advantage over our opponents while working towards Boots of Travel. You may be able to get a sneaky kill by hiding behind trees, then ambushing and casting Laser and Missile on a clueless enemy hero, but don't count on it. On the other hand, if we have an allied nuker in the lane, consider being very aggressive to get kills- Tinker with another nuker can kill many heroes from full health!
After getting some basic items and Boots of Speed, it's time for perhaps the most difficult part of the build: saving 2200 gold to buy the Boots of Travel recipe. At this point, I strongly recommend buying a set of Observer Wards. I cannot stress enough how helpful Observer Wards are. Apart from the standard significant benefits of avoiding ganks (one gank avoided is worth about two or three sets of Observer Wards), Observer Wards help Tinker in particular because the extended vision range allows Tinker to hit far away opponents with Missile. Generally, it is difficult to take advantage of the full 2500 range on Missile, and Observer Wards can help you to achieve that. Simply place two wards near your lane to cover possible ganks. On the side lanes, this means one ward in the river (preferably by the rune, to help your team) and one ward in the forest. In the center lane, one ward at each rune spot should work.
Middlegame- until Manta Style:
You got Boots of Travel. Breathe a big sigh of relief. Even if the rest of the game goes badly for you, Boots of Travel alone means you will always be able to be helpful to your team no matter what happens.
There is one thing that defines us at this stage- Boots of Travel + Rearm. This combo has countless uses, the most important of which are described here.
The most basic use is to teleport to the fountain to regain mana, then use Rearm and teleport back to your lane. Mana is now a non-issue, so you can unload your arsenal on unlucky opponents and creeps. Use March every wave, Missile every time the cooldown ends. Often, you can drive away an enemy hero by repeatedly using Missile/Laser/Rearm. Though your mana will be depleted, you can quickly teleport to the fountain, Rearm, and teleport back, while the enemy hero must make the long walk back to their own fountain.
Our goals at this stage are to gank weak enemies and to farm in safety, in that order. Watch for weak or low hp heroes in any lane, then teleport to that lane where you can't be seen, come up from behind trees, and nuke them to death. Always see if your allies in the lane can help when you perform these ganks, nukers being the most useful. Many times, you will be able to kill one enemy hero repeatedly by teleporting to his lane and ganking each time he respawns, which is even better if that hero is a carry hero. Intelligent opponents will soon see through this strategy, but that is perfectly okay. Scared opponents will push less and give your allies less trouble, which helps you get into the lategame where you can shine.
If no enemy hero makes a good target, try teleporting to a lane with no enemy hero and simply farming. Once you get level 3 or 4 March, you can use that if you want, but in general last hitting should be enough to gather lots of cash. If there is no enemy hero around to stop you, last hitting is as effective or more so than using level 4 March, unless your goal is to push.
Always watch the minimap! You need to watch for two things: missing heroes and towers/lanes that need help. If enemy heroes attempt a push, you can probably fight it off by teleporting over, then repeatedly March/Rearming. Overlapping marches will decimate even the largest push. Beware of ganks as well- there is nobody opponents like to gang more than a solo farmer. For this reason, try not to stay in one lane for too long and keep an eye on the minimap. If you can't find two of the enemy heroes, it may be a good idea to go farm somewhere else for a while.
Keep a lookout for heroes with low life. Often when a hero is in red, you can teleport in and Missile to kill. Even if they see the teleport coming, they will often not be able to escape in time, as 2500 range is VERY long (about two screens). Be sure to help out allies when you can by teleporting near friends who are in combat or fleeing.
In summary, our goal at this stage is to always be in the right place at the right time with careful Boots of Travel use. Farm safely and defend whenever necessary.
Lategame- after Manta Style:
The moment you get Manta Style, your power level makes a huge jump. We will now push any lane we see incredibly quickly while continuing to use the techniques described in the previous section. Teleport to whichever lane the enemy creeps are most advanced in and start pushing really hard there, using the Manta/March Turbo-Push described in the tactics section below. By being able to quickly push any lane we choose, we become an extremely dangerous pusher. In addition, Manta allows us to deal high damage to towers- since each image deals 40% of the base damage, Manta provides us with almost an 80% boost in damage output.
By Turbo-Pushing, you can simultaneously throw the enemy team onto the defensive and generate huge amounts of cash. Once you aquire Guinsoo's, you will be able to own most heroes and survive most ganks. With Linken's Sphere, spells slip off you like water (Rearm refreshes the spell shield). No hero can beat you 1v1, and few can beat you 2v1. This means that to stop one of your pushes, the enemy team must commit multiple heroes to running across the map to meet the teleporting Tinker. By anticipating this strategy, you can teleport to the opposite side of the map as they approach you, thus removing the would-be gankers from the game while you continue to farm and push. This puts tremendous pressure on the enemy team, and your allies will likely be able to make progress.
You now have two strategic choices to end the game. You can either continue teleporting between the side lanes, Turbo-Pushing the map, or you can travel with your allies for one big push. The advantage of going alone is that, since no single hero should be able to stop you, the enemy team must commit at least two heroes to facing you, which gives your allies numerical advantage elsewhere. On the other hand, traveling in a group makes that group extremely powerful, especially if you repeatedly Rearm, March, and Hex. In any case, the game will likely soon be over as you complete your item build.
6. Key Tactics
These tricks are the key to doing well with Tinker. Learn them well:
Aiming March of the Machines:
This ability is based on Stampede from ladder, but does not involve channelling. You click a target area, and a swarm of machines starts running from behind the Tinker in the direction of the target area. The little Goblins stop and explode when they hit an enemy, doing some AOE damage.
The naive method of aiming is to just select March and click in the middle of the enemy cluster, but this is not the most effective method. Since the machines will come from behind the Tinker, they will take a while to reach the enemies in front of him. In addition, the ranged creep will be shielded by the melee creeps in front of it and take no damage.
Instead, one might try aiming backwards, so the machines come from behind the enemy creep wave. This has the advantage of the machines hitting the target sooner and giving enemy heroes no time to get out of the way. However, one pitfall is that a stream of goblins may hit the ranged creep, shielding the melee creeps and wasting all that nice AOE on a single unit.
The most effective way to aim march is diagonally backwards in a line perpendicular to the enemy creeps. This sounds confusing, so see the following pictures:
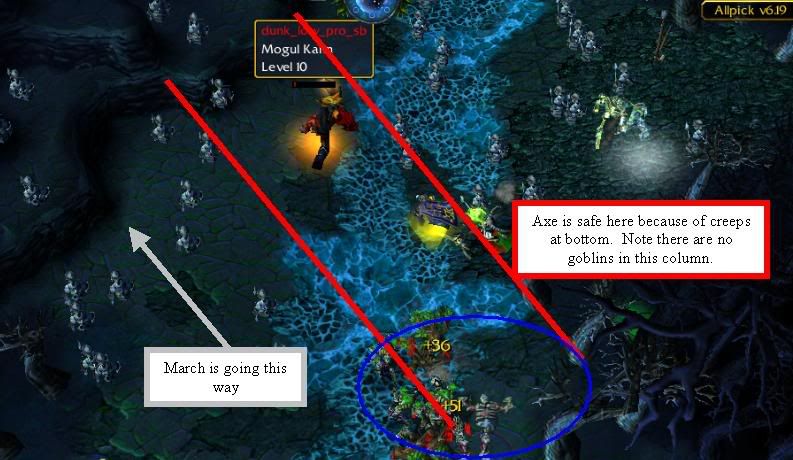
This is an example of what I mean by shielding. The Axe has only a sliver of health, but the March will not kill him because his creeps at the lower right are shielding him. If you are not careful when you aim, the ranged creep will shield the melee creeps.
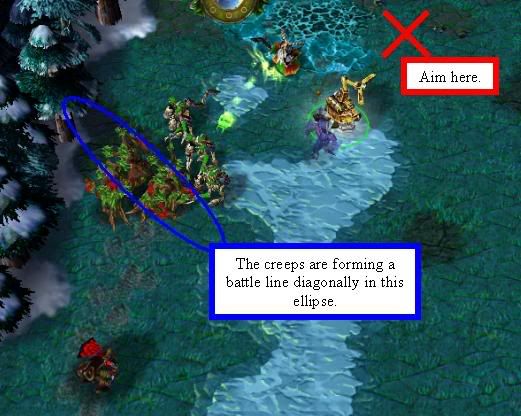
Here is the start of a perfectly executed march. Notice how the creeps are beginning to fall into a diagonal line.
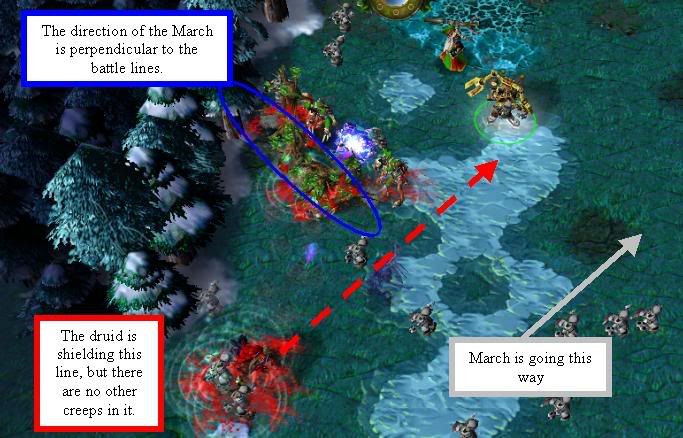
The march comes perpendicular to the diagonal line of the creeps, scoring lots of hits. All those little red blood spurts are goblins hitting their targets. In the game, I got every kill in this wave except one that the Stealth Assassin took.
Manta/March Turbo-Pushing (VERY IMPORTANT):
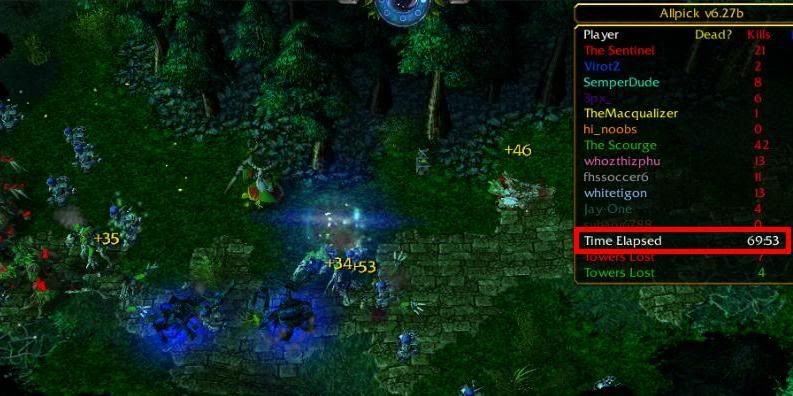
One of the many reasons Manta Style is so good on Tinker is that the images can quickly mop up the survivers of a March of the Machines wave. As soon as you have Manta, you can farm and push insanely quickly by running up to a creep wave (preferably without too many allied creeps around), activating March and Manta, Rearming, then running onwards to the next creepwave while your images and March finish off the creeps. Note that you take very little damage doing this because as soon as you start rearming, the creeps decide you are no longer a threat and shift their focus to the images. Since you can be well on your way to the next wave before the images finish off the one you were just on, you have just effectively killed an entire creep wave, getting every kill, in about three seconds. This technique is absolutely crucial to the strategy. In almost all my games, I do this constantly. Here are screenshots showing one instance of a turbo-push. In them, watch the clock to see how quickly this all takes place.
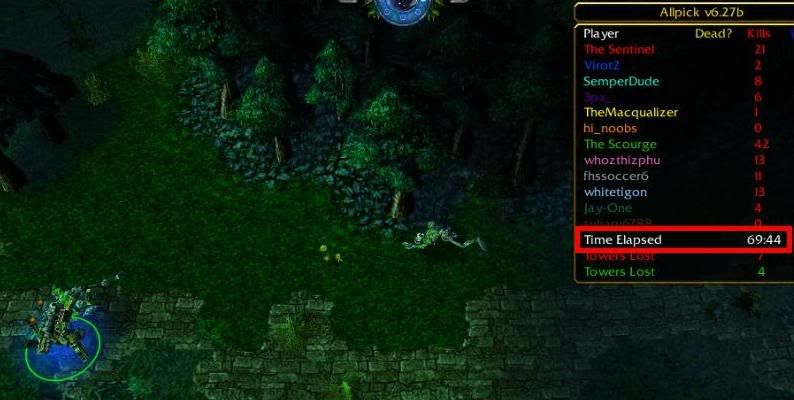
69:44- Here I am sprinting down the bottom lane ahead of my allied creep wave. As you can see, the next enemy creep wave is just coming into view.
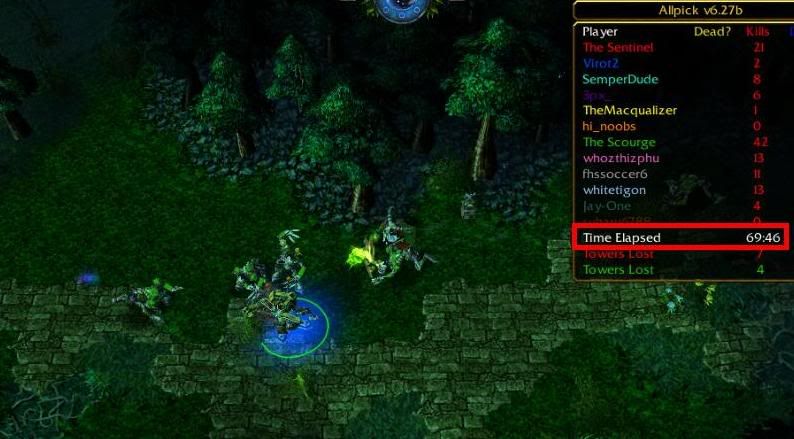
69:46- As the creeps begin to cluster around me, I start the turbo-push. In this screenshot, I am casting March of the Machines and will use Manta Style as soon as it is done casting (this will happen automatically if you click Manta Style immediately after clicking to cast March). While turbo-pushing, aiming March is much less important than when farming with March alone.
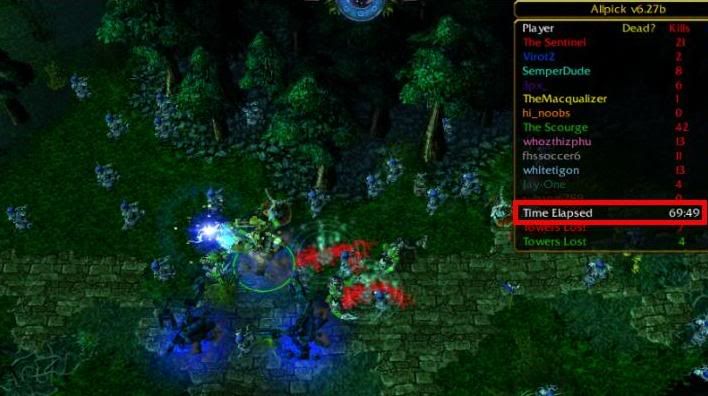
69:49- Three seconds later, the turbo-push is complete. In this screenshot, I am finishing casting Rearm, the final step of the turbo-push. Unfortunately, it is impossible to queue commands after Manta, so to cast Rearm simply hit 'R' as soon as the Manta begins to cast. You can, however, set a waypoint after Rearm. If you look very closely in the picture, you can see that I have set a waypoint to move to the open space to the right of the Tinker so he will run towards it as soon as Rearm is finished. (To queue commands, hold shift while issuing them. Your hero will carry out his current orders, then immediately perform the queued command.)
69:49- Three seconds later, the turbo-push is complete. In this screenshot, I am finishing casting Rearm, the final step of the turbo-push. Unfortunately, it is impossible to queue commands after Manta, so to cast Rearm simply hit 'R' as soon as the Manta begins to cast. You can, however, set a waypoint after Rearm. If you look very closely in the picture, you can see that I have set a waypoint to move to the open space to the right of the Tinker so he will run towards it as soon as Rearm is finished. (To queue commands, hold shift while issuing them. Your hero will carry out his current orders, then immediately perform the queued command.)
69:53- Success! A mere four seconds after completing the chain of commands for a turbo-push, the marching goblins and the two images finish off the wave while the real Tinker is already off the screen, far ahead and dashing towards the next creep wave and new victims of the turbo-push.
To reiterate, the turbo-push works as follows:
Run down a lane ahead of allied creeps until encountering an enemy creep wave.
Cast March of the Machines (aim doesn't significantly matter)
Use Manta Style immediately after March.
Cast Rearm as soon as you regain control after Manta.
Queue a move order past the creep wave and move on.
While turbo-pushing, try to keep Manta refreshed at all times, because it greatly increases your chances of survival. You can use it to escape from numerous abilities, completely void slowing effects, or just take the fire off you in battle.
Cyclone/Purge Usage:
The most obvious use of Eul's Sceptor of Divinity is to escape from enemy gangs. You can also use it to get kills by casting Missile/Laser, using Cyclone, then Rearm while the hero is in the air and Missile again when the hero lands. If you have lots and lots of mana, you can also cast several Marches under the Cycloned hero so he takes plenty of extra damage when your target lands.
In the brief period of the game in which you have Diffusal Blade, Purge can be used the same way, but the slow from Purge makes it ideally suited for holding a hero in the middle of a March. Cast March first, then Purge the hero as the goblins start to hit him. Since you won't have the Diffusal Blade for a long time in this strategy, be liberal with your Purge use.
Lategame Combat vs. a Single Hero:
Whenever you use Manta while not facing an enemy hero, immediately Rearm. This ensures that you're ready to split if an enemy surprises you. The first thing that an approaching enemy must do is figure out which image is real: if they start attacking the real one, immediately use Manta again, select yourself and your images, and start focusing on the enemy. This is a significant amount of damage and many heroes will flee: if not, use Guinsoo's and keep focusing. If the hero keeps coming towards you after the Guinsoo's, Rearm if you don't think you can kill him before the hex ends: this way you are ready to use Guinsoo's again as he comes out or to split again if he starts whacking you. There is really no practical way for a single enemy hero to kill a Tinker with Guinsoo's and Manta, since unlimited hex AND split make dealing damage to the Tinker nearly impossible.
Lategame Combat vs. a Gang of Multiple Heroes:
If two or more heroes are facing you, Hex the strongest and start hitting. Unless the enemies can figure out the correct image, you actually have the higher damage output. If they do guess the right image, split and either keep hitting or run, depending on how it looks. The nice thing is that Linken's Sphere makes you immune to most dangerous disables, so it should be hard for enemies to keep you down. If things turn bad, don't be too afraid to Rearm while enemies are around: you have a lot of HP and getting one more split and sheep can often save you where simply running could not. Also, make a habit of casting March whenever you can while facing enemy heroes: I automatically cast March (and Missile if low hp heroes are around) right before I use Manta. Finally, don't rule out the possibility of using Guinsoo's, then teleporting away. Being forced to flee isn't terrible because you can be back with full health in 20 seconds.
Combat in Team Battles:
In general, after you have Manta Style you can help your team more by pushing alone than you can in a group, but you will still need to be able to work well in larger battles for when you need to defend. When many enemy heroes are around, the best thing to do is to repeatedly cast March, Hex, Rearm (and Missile/Laser if you think it will make a difference). Overlapping Marches form one of the strongest AOE's in the game, and will often force enemies to retreat. This is the key to your defensive abilities.
Permahex:
By repeatedly using Guinsoo's and Rearm, you can keep a single enemy hero (or Roshan) hexed indefinitely, or until you run out of mana. In 1v1 combat, this is much less useful than you might expect, because you must stand still while you Rearm and some of the hex time must then be wasted chasing after the fleeing sheep. However, with allies around this can be deadly. A single enemy hero, no matter how powerful, can often be taken down by a gang using this technique.
Clock Tricks:
This tactic is fairly advanced and will not greatly change your playstyle, so feel free to skip over it until you feel more comfortable with other parts of the build. However, this is a good way to improve your results once you feel comfortable with Turbo-Pushing.
As you will likely find, March of the Machines will almost always have some of the kills stolen by allied creeps if they are nearby. You can reduce the chances of allied creeps taking kills by launching your March before the creeps engage in combat, so the goblins begin to hit the enemy creeps as they walk up. This way, you will have done AOE to all of the enemy creeps before any one of them can be focused by allied creeps and taken out. In fact, you will notice in the March demonstration pictures above that the march was already on its way before the creeps were fully in place. Thus, it is to your advantage to use March as creeps approach. What can make this difficult is that it is often hard to see the next wave of creeps before it is on top of you. What we will do is use the clock to our advantage, and predict the positions of creep waves.
Fact: creep waves spawn every 30 seconds starting at 1:30 into the game. As you encounter creeps in a lane, note the game time to see how long it takes enemy creeps to reach that point. Another wave of enemy creeps will pass by that point every 30 seconds, so if you keep an eye on the clock, you can be ready and start a March roughly 5 seconds before they reach that point, which will significantly increase your yield from the wave. This is particularly useful when sieging a tower with allied creep support. You will be able to devestate the defending wave before the creeps engage each other, reducing the time creeps spend fighting each other and thus increasing the time they spend whacking the tower. Another time when this is particularly handy is when defending an allied tower from a concerted push. If you can greatly damage most of the attacking wave before it gets anywhere close to the tower, you can keep your towers alive much longer. Finally, keep the clock in mind when sieging the base tower. When the clock hits 25 or 55 seconds, begin your next Manta/March turbo-push, and the goblins should be crossing the screen right when the enemy creeps spawn in their path to prevent the spawning defenders from being able to stop your push.
Of course, the very annoying thing about using the clock is that the huge scoreboard blocks off about a sixth of the screen when it is down, so only bring the board down for a moment to see the clock, then put it back up and count in your head if necessary. As difficult as this sounds, it will become natural after done a few times and will make your game go much more smoothly.
7. Troubleshooting
No game will go perfectly. Actually, that's a lie. Games often will go perfectly. But sometimes they don't, and you need to be prepared for the things that go wrong. DotA is a game of strategy; you must react to opponents and not blindly play the same way every time. Here are some problems and suggested solutions.
Trouble Farming for Boots of Travel:
By far the most common place to run into trouble is after getting Eul's and while saving up 2200 gold for Boots of Travel. This is the weakest stage of the game for Tinker. Since you will be killing waves of creeps with March to farm, your creep waves will be advancing far into enemy territory and making yourself susceptible to ganks. First of all, if you know your opponents like to gank, be smart and don't advance too far. If you plan to be in one lane for a while, Observer Wards are a solid option that few people consider. In general, you will simply need to use the same survival skills you would with any hero faced with ganks. Just be aware that the period farming up to Boots of Travel is the weakest period of the game for Tinker.
Aggresive Pusher Opponents:
If the game lasts long enough, you can almost always turn it around. The true problem comes against a team that intends to win quickly. I will typically acquire Manta Style in 45-50 minutes, so a team at the gates of your base in 40 minutes can really ruin your day. Watch the strategy the enemy team is using through the early stages of the game. If they have a team of multiple pusher heroes or they display significant teamwork in taking down towers relatively early, you should prepare for defense. Whenever you see multiple enemy heroes in a lane, teleport (or walk, if you don't have BoT yet) to the tower and use carefully timed Marches so that goblins cross the path just as the enemy creeps show up. With this method, you can probably kill all the creeps and often will force heroes back until the next creep wave. This simultaneously buys time and earns money.
Permabash:
Although Tinker has Laser as a built-in defense to bash (25% miss chance), the Tinker spends so much time alone that a permabashing hero, especially a ranged one like Troll, can keep you helpless until you die. If you see an enemy hero going for a basher build, change your skill build and get Laser before stats and use Laser the instant you see the hero. If Laser alone isn't enough, you must hope to Manta and Hex before you start getting stunned, which can lead to tense battles. A fed bashing N'aix is also a huge threat (a fed N'aix without bash you can simply teleport away from as he attacks you). If the bashing hero is really too much, simply try to stay away at all times, guessing the hero's location and teleporting to whichever lane the hero is not in.
8. FAQ
Query: Are you clueless? Multiple uses of Manta Style makes the old images disappear, so you don't get 20 images at once and your build doesn't work.
Answer: That's not the point. We don't want to create large numbers of images at once but rather take advantage of Tinker's ability to create images and "split" whenever he wants. To anyone who is unconvinced that this can be effective, please watch the replays.
Query: Why not get Dagon?
Answer: Dagon-Tinker is quite powerful, but works towards different goals than in this build. The strategy presented in this guide is designed to progress from a strong earlygame to a lategame in which you can carry your team. Going for Dagon abandons carrier ambitions and allows Tinker to focus completely on being a ganker. This is perfectly fine and can allow your teammates to win the game while the enemy team struggles to survive. If you want to try this build, it shouldn't be too difficult to figure out what to do- get a Dagon and Boots of Travel, then appear and nuke enemy heroes everywhere at inconvenient times.
Query: Why not get BKB?
Answer:
Any questions?
To be more explicit- BKB interacts poorly with Manta Style. Using Manta Style after BKB cancells Avatar, and using BKB after Manta Style makes it very, very obvious which is the real Tinker. While permanent magic-immunity is alluring, note that there is a bug involving repeated uses of BKB- if you activate BKB while Avatar is ending (during the animation of Tinker reverting to normal form), you will lose control of your hero! This is a problem with N'aix and his ultimate, but N'aix has the -recreate command enabled just for him. Tinker does not have access to -recreate, so if you lose control of Tinker, you're out of the game. This means you have to wait a second or two between BKB activations, which gives the enemy team plenty of time to disable you, so BKB is not as effective to counter magic as it might seem.
Query: Wouldn't Refresher be good?
Answer: No. Rearm does not refresh a Refresher Orb.
Query: Does Laser deal exactly the damage it says?
Answer: Yes Until somewhat recently (6.35), Laser had attack type Normal, which meant it did 75% damage to heroes and other odd percentages to various armor types (such as 125% damage to heavy armor, for example). Now, Laser's attack type has been changed to Hero, so it really does do the stated damage.
Query: When I get Manta and Skadi, feedback overrides frost when attacking heroes. Is there any way to get the frost effect against heroes?
Answer: That's just the way it works. For some reason, feedback is considered a buff-placer, and so it overrides Skadi against non-magic-immune units with mana. No amount of changing the order of items in your inventory will fix this. Nonetheless, Skadi is still a great item for it's hp, mana, and stat boosts.
That said, there is a way to gain the frost effect on attacks while carrying Manta. What you need is another orb effect. For example, suppose you have Manta, Skadi, and Satanic. In this case, your attacks will have both lifesteal and frost (but not feedback). Many people will look at you funny for having three orb effects (or technically two, since ranged Skadi is not an orb), but you will get that great slowing attack you wanted. I haven't found a good way to incorporate this into my build, but that doesn't mean such a strategy doesn't exist. The "third orb effects" with which this would work are Maim, lifesteal, and Maelstrom/Mjollnir.
9. Final Note
This strategy may sound stupid and useless when you read it: it is certainly unorthodox. Nonetheless, the results I have had using it speak for themselves. The best part, however, is that this strategy is incredibly fun. You have so many different tools at your disposal that combat is always interesting and never repetitive. I recommend this strategy to anyone who wants to try something new, fun, and effective.
10. Replay Section
Note: In the two latest replays, I play under the account "udu," which I use when I feel that my internet connection is somewhat unreliable (which is pretty much all the time where I am now). Shouldn't be too hard to find me: I'm the one choosing Tinker. The name "udu" is a painful nerd joke- it is a "dummy" account, and "udu" appears in calculus when using u-substitution, the introduction of a "dummy" variable.
1.21_Tinker_Carry.w3g ( 958.87k ) Number of downloads: 773
This 6.42 replay shows the true power of Tinker's nukes. I get off to a good start with First Blood. Since I am solo lane against solo THD, I know I will end up in a contest of nukes (good thing mine are better ;-)), so I buy many tangoes and clarities and end up controlling my lane without difficulty. Once I get Boots of Travel, I spend much of the game teleporting to lanes with weak heroes and nuking them away. Trozz, a longtime forumer, appears on the other team, but his clever Techies play is not enough to save his team. I lead on kills the entire game through ganks and the aid of competent allies, and end the game with 16-0. This replay does not feature any kind of "comeback" like most of those I post and my team is never really in trouble (though it's not an easy win by any means), but it does showcase how Tinker's early to midgame can be utterly devestating in the right circumstances, even before getting Manta. I also solo Roshan for fun at some point.
1.21_Tinker_Support.w3g ( 1.26mb ) Number of downloads: 701
Here's a 6.41 game showing how Tinker can make a big difference for the team even when things individually don't go too well. In this game, our team of random pubbers play against several friends on LAN. We have a Bloodseeker who goes 1-6 and leaves, making the game 4v5, and our team trails on kills the entire game. Noting that the enemy team is focusing heavily on ganking, I buy 12 Observer Wards over the course of the game, which save my allies and me on numerous occasions. Despite the 4v5 disadvantage, the enemy team cannot cope with the combined pushing pressure of me and our allied Keeper of the Light. This replay does not so much show off the carry power of Tinker, as our allied Faceless Void goes 8-1 and acts as our carrier. Nonetheless, this is a well-executed example of how Tinker play can hold off large pushes, keep the other team defending for long periods of time, and constantly keep enemy heroes retreating.
(Old Replays: These are replays from patch 1.20, so they can no longer be watched normally. However, it is still possible to watch them by fiddling with your .dlls: see this thread for details. Be careful if you try this, as a mistake might cause big problems, though if you follow the directions to the letter you should have no trouble)
_6.32b__Tinker_Epic.w3g ( 995.43k ) Number of downloads: 6691
Here's a recent replay from 6.32b. This game is eventually reduced to a 3v3 in which our team is significantly down in tower and hero kills. Furthermore, our remaining team is entirely composed of intelligence heroes (the others are Leshrac and Rhasta), and the rather fed enemy team of combat heroes (Sand King, Nerubian Assassin, Bristleback) is starting to get BKB's. When the enemy team can effortlessly kill my allies and a magic-immune team battling a team of disable-reliant intelligence heroes, it takes Tinker's secret weapon to win the game. This replay has a thread in the Replays forum with a more full description, found here.
_6.27b__Tinker_with_Manta.w3g ( 506.54k ) Number of downloads: 7262
This replay demonstrates a typical example of the power of Manta Tinker. By the time I get Manta Style at 43 minutes, we are in a 3v4 and the enemy team has more than double our number of kills (13-27). In fact, one opponent has just announced "gg" after a member of our team left. Despite the seemingly difficult odds, Manta Tinker simply walks right over the enemy team, and we win the game in 20 more minutes with relatively little challenge!
_6.27b__Tinker_Impossible_Victory.w3g ( 1.04mb ) Number of downloads: 19446
The Big One- if you hear someone talking about a Tinker replay on the forums, they probably mean this. This replay has a long thread in the Replays forum, found here. Here is my description from there:
QUOTE(Virot2 @ Feb 20 2006, 06:39 PM)
Picture this:
-It's 80 min into the game, 4v4
-The game score is 21-50, and every hero on the Sentinel team has a negative record
-The Scourge have lost 5 towers, the Sentinel 8 (including two base towers)
-The entire Scourge team has godly items:
--- Drow has Burize, Butterfly, and Stygian
--- Stealth Assassin has MKB, Sange & Yasha, and Heart
--- Axe has Heart, Aegis, and a Reaver
--- Zeus has BoT, Refresher, and Aghanim's
-The best hero the Sentinel have is a Tinker with 2-6.
See if you can guess who wins the game, then watch the replay and be amazed.
This is taken directly from www.dota-allstars.com.


